
I may not have the proper terminology for all of the parts but I am going to try my best to explain it
An overview of the parts!

1- Platter
2- Cartridge
3- Headshell
4- Tonearm
5- Anti-skating dial
6- Counter weight
So assuming you bought a new cartridge for the turntable. The first step is to install the wires that come out of the headshell to the prongs on the cartridge.
I use needle nose pliers to take these wires off and put them on the cartridge. It usually shows which color wire goes on which prong on the back of the cartridge. If it does not, you can google the cartridge you have and I am sure you can find out which wire goes on which prong.

Pic showing wire coming from headshell.

Pic showing wires connecting to cartridge.
***The next step below is assuming you have a standard mount cartridge (held on by two screws on the top) which needs to be aligned. If you have a "p-mount" cartridge (held in by one screw that goes through the side) it does not need to be aligned. You can skip this step and go to balancing tonearm step.
Next I screw the cartridge to the headshell (obviously if you are replacing a cartridge take the other cartridge off first!). When you screw the cartridge to the headshell just screw it so that it is barely tight. So you can still move the cartridge around with your fingers.

Pic showing screws.
Once you have the cartridge installed on the headshell you will need to align the "azimuth". What this means is you want the needle to be perfectly vertical. You twist the headshell to the right or left where it connects to the tonearm to adjust this. If it leans left or right you will notice different volume from your speakers. Align this by eye. I find putting a little mirror under the stylus when I do this can help you see if it is perfectly vertical. A lot of turntables have it so that when the headshell is attached to the tonearm it cannot turn. If this is the case for your turntable than you do not have to worry about this step as it is already aligned vertically.
Next you have to align the cartridge. To do this you will need a cartridge alignment protractor. These can be found online and printed off. Basically it is a piece of paper (or cardboard, plastic, etc..) that you put on your turntable (see pic). You then put your needle directly on the dot that is on the protractor. Once it is on the dot you need to turn the cartridge so that it is parallel with the lines on the protractor (this is why you did not tighten the screws too much, so you can turn the cartridge). When you get it perfectly aligned, tighten the screws the rest of the way. Your cartridge is now installed!

Pic showing protractor.
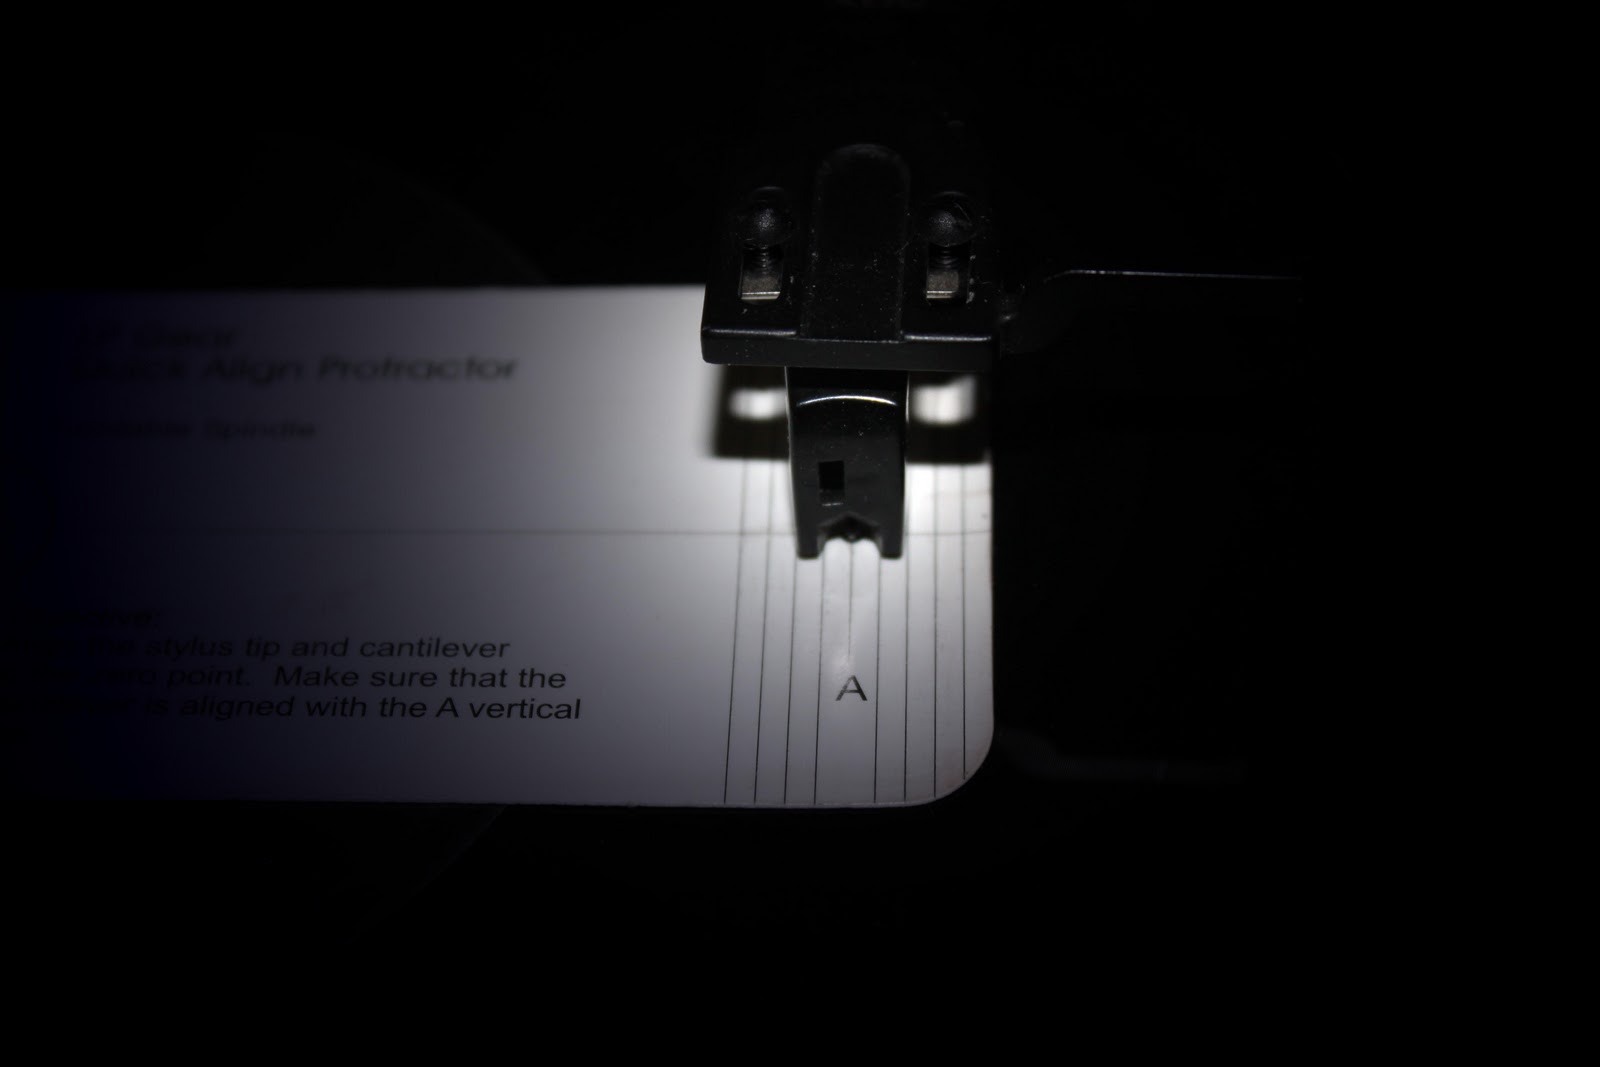
Pic showing the cartridge being aligned with the protractor.
Now the easy part! Time to put the proper weight on your cartridge. (aka- setting the tracking force)
First you will need to adjust the weight on the back of the tonearm until the tonearm floats horizontal with the turntable platter. All you have to do is turn the weight left or right until the arm floats.

Pic showing weight at back of tonearm.

Pic showing tonearm floating parallel with turntable platter.
Once it is balanced you need to add the proper weight of the cartridge to the tonearm. Sometimes this is a seperate dial on the back of the tonearm. But most of the time you just turn the dial that is part of the counter weight (do not turn the actual weight, just the dial with the numbers on it) to zero. Once it is at zero turn the weight and the dial together until you are at the proper weight of the cartridge. Most of the time the weight for the cartridge is 1.5oz. So when in doubt I turn it to 1.5oz.
Next you set the anti-skating. The anti-skating is what controls how fast the needle will pull to the center of the record. You want the needle to pull very slowly to the center of the record (You can see how fast it moves by placing the needle on the dead wax of a a record). I find that if you set the anti-skating to the same number as your cartridge weight it usually works best. So if the cartridge calls for 1.5oz, set the anti skating to 1.5oz also.

Pic showing antiskating dial.
That is basically it for setting up your turntable. You are complete! Congrats!
Now I know a lot of "audiophiles" will probably say I am missing steps or doing something not perfectly right, and that's ok! I can use the criticism! All i can say is I have set up all my turntables this way and have thousands of hours of vinyl playing on them with no problems or damage to the records! So at the very least, this guide is a great starting point.
Hope this helps!
Folks, I want to mention that your turntable should be sitting perfectly level too. I have a little carpenter's level that I use to make sure my table is not off-kilter. Some tables have feet on the bottom that can screw up or down to adjust. If your table doesn't have adjustable feet, try to level it out with a couple sheets of paper or thin cardboard under one of the feet.
ReplyDeleteI really don't know if this makes a BIG difference, but I read this on an audiophile blog and usually audiophiles know what they are talking about :P
If anyone can answer this for me, I'd appreciate it. If you have a record that has a particluarly bad jump or skip, would it be a good idea to make the tonearm heavier (temporarily) to see if it plays through?
Also important as (I didn't see it here) is the cartridge overhang has to be adjusted so that the path if the stylus is as perpendicular to the spindle as possible. For example a Technics with an S-Shaped tonearm has a 52mm distance from the rubber washer at the back of the headshell (not including the connector) to the tip of the needle. A ton of tables share the same 52mm overhang but some tables are different like JVC (49mm) and I believe Pioneer are different as well. I just use a tape measure to check the distance, but you can also get a jig meant for SL-1200MK2 tables off eBay for cheap that matches the 52mm system easy and works with alot of tables.
ReplyDeleteThis is a very good guide though, covers the basics of just about every turntable. The only thing left is VTA adjustments and most tables other than the high end stuff (like that SL-1800!) don't have that option anyway.
-----
As for bad jumps and skips, I don't like the idea of making it heavier temporarily to play as it's really hard on the stylus and vinyl and depending on whats causing the skip might make it worse. I'd check to see if there is debris in the groove, if it's a warp or a bad scratch. Can't do much about scratches, but records can be cleaned and you can get record flatteners for warped vinyl.
Another way of getting the optimum tracking quality out of bad records would be that when picking your cartridge, make sure the compliance on the cart best matches the effective mass of the tonearm, basically meaning how flexible the stylus cantilever is. Low mass tonearms (like Dual tables) need a high compliance (very flexible) cartridge to track the best, whereas heavier tonearms (like on a 1/2" mount Technics) need a low compliance (stiffer) cartridge. The logic behind this is the proper combination absorbs the impact of record defects better and minimizes the jumping around. Heavy tonearms have more momentum and are harder to move, but a sufficient shock is enough to send it out of the groove, and low mass arms are easier to push around, so the stylus/cartridge needs to be able to take a share of the punch proportionate to how the tonearm can take it. An improper tonearm mass+cartridge compliance combo can also lead to resonant frequency feedback through the tonearm, in some cases reaching audible levels and increasing rumble noise.
Here's a helpful link: http://www.ortofon.com/support/cartridgetonearm-resonance-frequency
Most carts play well with Technics tonearms from what I've seen anyway and can't see why compliance would be an issue here with that Stanton cart either. Even those with compliance outside the range doesn't cause many problems, I've used my Shure M95ED (very high compliance of 30uN) since it came on my Technics table 4 years ago, and haven't had any real issues with tracking other than on some warped stuff. It is worth noting though that high-end Moving Coils have very low compliance and are not well suited for low mass tonearms - but would pair well with a Technics.